Sliding Catalog on the Right with CSS and JavaScript
Sometimes it’s more convenient to show a catalog not on a separate page, but on top of the current content. One simple option is a sliding panel on the side of the screen.
In this example, the catalog is implemented without external libraries: CSS handles the animation, and a small JavaScript snippet manages the state.
General Principle
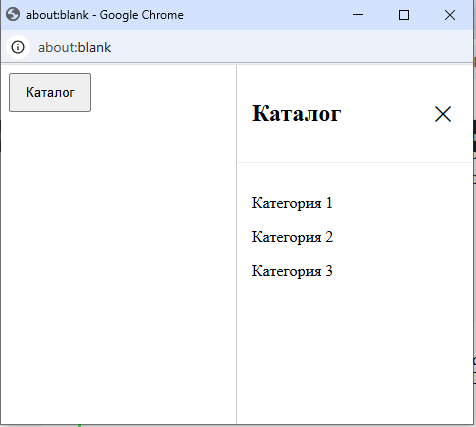
The catalog is a fixed block initially positioned outside the right edge of the screen.
Clicking the button adds the .active class, making the block appear.
Clicking the close button removes the class, and the panel slides back out.
Panel Styles
#catList {
    position: fixed;
    top: 0;
    right: 0;
    width: 1520px;
    height: 100vh;
    background: #fff;
    border-left: 1px solid #ccc;
    z-index: 99999;

    transform: translateX(100%);
    transition: transform 0.3s ease;
}
The panel is fixed relative to the browser window and takes the full height of the screen.
The transform: translateX(100%) moves it completely out of view to the right.
Active State
#catList.active {
    transform: translateX(0);
}
When the .active class is added, the panel returns to view.
The movement is smooth thanks to the transition property.
Header and Close Button
.blockPanel {
    display: flex;
    justify-content: space-between;
    align-items: center;
    padding: 15px;
    border-bottom: 1px solid #eee;
}
The header uses flex to place the title on the left and the close button on the right.
.close-btn {
    background: none;
    border: none;
    font-size: 22px;
    cursor: pointer;
}
The close button is a simple button with minimal styling.
HTML Structure
<!-- button  -->
<button class="draft-btn" id="openCatalog">Catalog</button>

<div class="blockPanel">
        <h2>Catalog</h2>
        <button class="close-btn" id="closeCatalog">✕</button>
    </div>

    <div class="content">
        <p>Category 1</p>
        <p>Category 2</p>
        <p>Category 3</p>
    </div>
</div>
Inside the block are the header and catalog content.
The content can be any structure: list, grid, filters, etc.
JavaScript
<script>
document.getElementById('openCatalog').addEventListener('click', function () {
    document.getElementById('catList').classList.add('active');
});

document.getElementById('closeCatalog').addEventListener('click', function () {
    document.getElementById('catList').classList.remove('active');
});
</script>
The script performs two tasks:
-
adds the
.activeclass when opening the catalog -
removes it when closing
All animation is handled by CSS.
Conclusion
This approach allows implementing a sliding catalog without complex logic or external dependencies.
The code is easy to read, and the panel’s behavior is controlled by a single CSS class.
<!-- Каталог всплывающее гавно-окно -->
<style>
  /* Сайдбар */
#catList {
    position: fixed;
    top: 0;
    right: 0;
    width: 50%;
    height: 100vh;
    background: #fff;
    border-left: 1px solid #ccc;
    z-index: 99999;

    /* спрятан */
    transform: translateX(100%);
    transition: transform 0.3s ease;
}

/* Активное состояние */
#catList.active {
    transform: translateX(0);
}

/* Шапка */
.blockPanel {
    display: flex;
    justify-content: space-between;
    align-items: center;
    padding: 15px;
    border-bottom: 1px solid #eee;
}

/* Крестик */
.close-btn {
    background: none;
    border: none;
    font-size: 22px;
    cursor: pointer;
}

/* Контент */
.content {
    padding: 15px;
}

/* Кнопка */
.draft-btn {
    padding: 10px 15px;
    cursor: pointer;
}

</style>


<!-- Кнопка открытия -->
<button class="draft-btn" id="openCatalog">Каталог</button>

<!-- Выезжающее окно -->
<div class="catList" id="catList">
    <div class="blockPanel">
        <h2>Каталог</h2>
        <button class="close-btn" id="closeCatalog">✕</button>
    </div>

    <div class="content">
        <!-- тут твой каталог -->
        <p>Категория 1</p>
        <p>Категория 2</p>
        <p>Категория 3</p>
    </div>
</div>


<script>
document.getElementById('openCatalog').addEventListener('click', function () {
    document.getElementById('catList').classList.add('active');
});

document.getElementById('closeCatalog').addEventListener('click', function () {
    document.getElementById('catList').classList.remove('active');
});
</script>
Latest posts in this category
-
 How to make any element a link using onClick
203
How to make any element a link using onClick
203
-
 HTML Select: hidden placeholder, highlight, and dynamic urgency indicator
221
HTML Select: hidden placeholder, highlight, and dynamic urgency indicator
221
-
 How to Detect an AdBlocker on Your Site Using JavaScript
321
How to Detect an AdBlocker on Your Site Using JavaScript
321


Leave a Reply