How to Create a Custom Admin Menu in WordPress: A Simple Guide for Beginners
WordPress allows you to add your own settings pages directly into the admin dashboard. This is useful when you need custom functionality: managing requests, plugin settings, displaying reports, and much more.
In this article, we’ll look at how to create your own menu and submenu items in the WordPress admin panel. You’ll find code examples with comments so you can easily apply them in your project.
Where to put the code?
The best place is inside a custom plugin or the functions.php file of your theme (preferably a child theme to avoid losing changes during updates).
1. Creating a single admin menu item in WordPress
This code adds a new item to the left admin menu, for example: “Timesheet Request”.
// ================================
// Add a menu item to the admin panel
// ================================
add_action('admin_menu', 'my_custom_menu');

function my_custom_menu() {

    // add_menu_page creates a top-level menu item
    add_menu_page(
        'Timesheet Request',     // Page title
        'Timesheet Request',     // Menu title
        'manage_options',        // Permissions (admins only)
        'tabel-request',         // Page slug
        'tabel_page_content',    // Callback for content
        'dashicons-clipboard',   // Icon
        30                       // Position
    );
}

// ================================
// Page content
// ================================
function tabel_page_content() {
    echo '<h1>Timesheet Request</h1>';
    echo '<p>This is an example of a custom WordPress admin page.</p>';
}
What does this code do?
-
Adds a new item to the left WordPress admin menu
-
Opens your custom page when clicked
-
Allows you to place tables, forms, settings, etc.
2. Creating a menu with four submenus
Now let’s create a main parent item “Timesheet Request” and add four submenus: 1, 2, 3, 4.
// ================================
// Create menu with submenus
// ================================
add_action('admin_menu', 'tabel_menu_with_submenus');

function tabel_menu_with_submenus() {

    // Main menu
    add_menu_page(
        'Timesheet Request',
        'Timesheet Request',
        'manage_options',
        'tabel-main',
        'tabel_main_page',
        'dashicons-clipboard',
        30
    );

    // Submenu 1
    add_submenu_page(
        'tabel-main',
        'Section 1',
        '1',
        'manage_options',
        'tabel-sub-1',
        'tabel_sub_1'
    );

    // Submenu 2
    add_submenu_page(
        'tabel-main',
        'Section 2',
        '2',
        'manage_options',
        'tabel-sub-2',
        'tabel_sub_2'
    );

    // Submenu 3
    add_submenu_page(
        'tabel-main',
        'Section 3',
        '3',
        'manage_options',
        'tabel-sub-3',
        'tabel_sub_3'
    );

    // Submenu 4
    add_submenu_page(
        'tabel-main',
        'Section 4',
        '4',
        'manage_options',
        'tabel-sub-4',
        'tabel_sub_4'
    );
}

// ===== Callback functions =====

function tabel_main_page() {
    echo '<h1>Main Timesheet Request Page</h1>';
}

function tabel_sub_1() {
    echo '<h1>Section 1</h1>';
}

function tabel_sub_2() {
    echo '<h1>Section 2</h1>';
}

function tabel_sub_3() {
    echo '<h1>Section 3</h1>';
}

function tabel_sub_4() {
    echo '<h1>Section 4</h1>';
}
What will it look like?
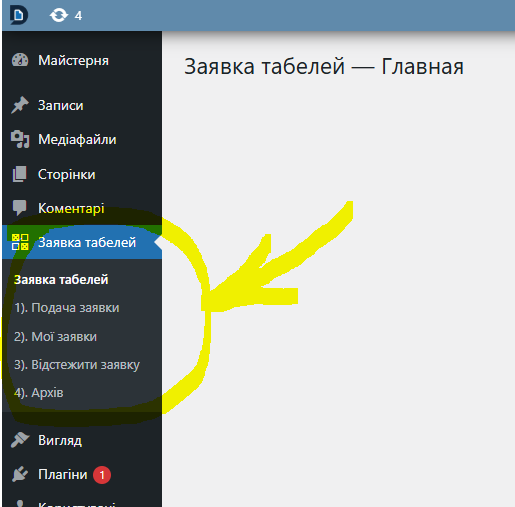
This approach is used to build plugins, dashboards, request systems, tables, analytics — almost anything.
Latest posts in this category
-
 Activation and Initialization Hooks in WordPress: Where and When to Create Tables
220
Activation and Initialization Hooks in WordPress: Where and When to Create Tables
220
-
 How to Create a Custom Table in WordPress via functions.php: A Complete Guide to MySQL Data Types
213
How to Create a Custom Table in WordPress via functions.php: A Complete Guide to MySQL Data Types
213
-
 HTML Select: hidden placeholder, highlight, and dynamic urgency indicator
222
HTML Select: hidden placeholder, highlight, and dynamic urgency indicator
222
-
 Customizing the WordPress Login Page: Logo, Colors, Background Image & Custom CSS
205
Customizing the WordPress Login Page: Logo, Colors, Background Image & Custom CSS
205
-
 How to Change or Completely Remove the Text in the WordPress Admin Footer
214
How to Change or Completely Remove the Text in the WordPress Admin Footer
214
Popular posts
 How to Display the Visitor’s IP Address on a Website Using PHP? 575
  Adding Meta Description and Keywords in WordPress 410
  How to Detect an AdBlocker on Your Site Using JavaScript 322
  How to Add a Currency Widget to the WordPress Admin Dashboard 252
  HTML Select: hidden placeholder, highlight, and dynamic urgency indicator 222
Leave a Reply